Course XVIII - Teaching 4: Preparatory Exercises I and II
Preparatory Exercises I
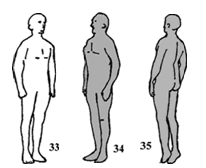
- Positions. Learn correct positions. At attention position. Lateral position. Passage position. Tiptoe position. In each position, raise arms high up; raise arms at your sides until the horizontal line; raise arms forward until the horizontal line. Later, learn natural position, with easier characteristics (Figures numbers 33, 34 and 35).
- Positions on the ground. Learn different forms of kneeling and sitting down, and adopt in this positions several positions of arms detailed on the precedent exercise. Later, you must sit down and get up with no help of your arms.
Also learn lying down positions: face upwards, face downwards and lateral. If your arms are strong enough, also you may practice the face-downward position: your right body leaned on your hands with stretched and vertical arms, and your feet together on tiptoe. - Lateral position. Raise your arms steadily forward high up, and later lower them to both sides, and try to lead them as backwards as possible. Breathe in when you raise, and breathe out when you lower. Three times.
- Lying down face upwards. Arms stretched at both sides with palms of the hands on the ground. Bring both legs towards thighs by bending knees (breathing out), and later stretch both legs upward by forming a straight angle with your trunk lying down (breathing in). Breathe for heart recovery, in lying down position.
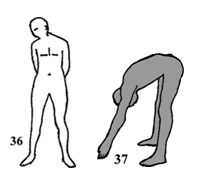
- Lateral position. Hands together on your back. Incline your head to right and later to left, keeping your chin up, with elastic insistence. This means that, when you reach the highest point of movement, you get back little by little so that through an elastic drive you overpass the above-mentioned highest point. Three times each (Figure number 36).
- Lateral position. Rotate each arm naturally (like sails of a mill) backward and later forward, and trace wide circles at both sides. First slowly and later intensely. Do not use the strength of your shoulders, but drives of thorax. This exercise stretches relaxed muscles of chest and shoulders. The rear area of the circle is the most important. Breathe out at the same time. The other arms on the hip. Six times each. Great breathing in with full breathing out.
- Position with knees and hands on the ground. Crawling position. Hands forward. Bend and straighten arms. Breathe in when you bend. This exercise prepares you for what we shall detail later, with your erect body leaned on your hands and on tiptoe. It strengthens extensors of arms and shoulders. 3-5 times. At once shake your arms.
- Lateral position. Arms high up, bend trunk forward with “elastic insistence” (see previous explanation number 5). This stretches just the area of hip and muscles of buttocks and flexors of legs; other areas are strengthened. Breathe out when you incline the thorax, and breathe in when you straighten it. Two times. (Figure number 37).
Breath for heart recovery
9) Passage position. Feet forward. Bend and stretch front knee slowly several times, trunk forward. Both feet remain on the ground; do not raise heels. Rear leg remains straight. It stretches the calf muscle.
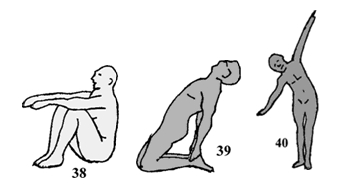
10) Sitting down on the ground. Legs joined and stretched. Arms stretched forward to both sides or on the back of the neck. Attract legs by bending kneels and straightening them. Open legs and join them. All this with your trunk as erect as possible. Three times each (Figure number 8).
10 a) Knelt on the ground. Sitting down on your heels. Each hand holds one ankle; raise your hip as high as possible (Figure number 39).
11) Natural position. Arms hanging freely. Bend the trunk toward one side (do not incline it forward and do not twist it), starting with your head and following vertebra after vertebra. Breathe out at the same time. Do not move your hip from its place. Also bend laterally the spine on the area of your chest. This stretches both sides.
Later, the same with arms horizontally stretched toward both sides, with “elastic insistence”; do not incline the trunk forward. (Figure number 40).
Chest breath. Respiratory exercise number 1.
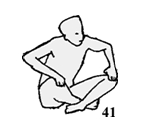
12) Sitting down on the ground. Crossed legs. Your hands must press simultaneously your knees against the ground in an elastic form (Figure number 41).
Preparatory Exercises II
13) Lateral position. Breathe in and while breathing out, raise both arms forward until the horizontal line, and at once lead them toward both sides and as backwards as possible, with simultaneous rotation of arms at both sides until the initial position. Arms at attention or natural position. Three times.
14. Lateral (or natural) position. Bend both arms lightly: stretch and separate all fingers; and close up your fists while you look at them. First slowly, but with greatest tension of fingers and muscles of arm and forearm; later, quickly. The same exercise can be practiced by advancing and retracting quickly your arms. While stretching them, your hands rotate and the open palms of your hands look outwards; later, shake your arms.
Both arms relaxed through shoulder drive (Relaxation exercise number 1).
15) Natural position. Raise one thigh until the horizontal line. The same, by raising both arms in different positions. With arms or in natural positions. Six times.
Thigh relaxed throuhg hip drive (Relaxation exercise number 13).
16) Lying down face downward. Trunk leaned on both elbows with forearms side by side, on the ground. Raise and lower buttocks while you breathe naturally. 4-6 times.
Later you can practice the same, but with your body erect, leaned on both hands (stretched arms) and just on tiptoe. Breathe for heart recovery by lying down face upwards.
17) Natural (or at attention) position. Arms at both sides; raise lightly one leg, straight, forward and toward one side. Rotate the leg inwards and outwards but do not alter the position of its axis.
Muscle relaxed through sliding. (Relaxation exercise number 14).
18) Lateral position. Stretched arms at both sides, close up your fists, and rotate arms horizontally, but do not alter the position of their axis.
Both arms relaxed through fall. Relaxation exercise 3.
18 a) Lateral position. Arms hanging freely. Bend your trunk, vertebra after vertebra, forward and with elastic insistence in the end, and breathe out. This stretches thorax extensors and leg flexors.
Later practice the same, but your movement will produce a strong and quick contraction of abdominal muscles. In this case, do not keep your arms loose, but increase their drive. Do not bend knees.
19) Natural (or at attention) position. Raise left stretched leg toward one side through drive. So, lead this led a little to right in front of right leg. Do the same with the right leg. Moreover, raise the leg forward and backward, but do not bend your knee. Both arms oscillate at the same time in the opposite direction. While driving the leg backwards, also lead head and trunk backward to stretch substantially hip muscles. The same can be practiced by raising the supporting leg on tiptoe to reinforce the drive. Three times each. Great breathing in with full breathing out.
20) Natural position (feet together). Raise arms forward until the horizontal line (on natural or at attention position). Bend totally your knees, with the whole sole of the foot leaned on the ground. In squatting, embrace your knees and join buttocks to heels. This stretches buttocks and extensors of legs (Figure number 42). Shake your legs.
Relaxed leg falls. Relaxation exercise number 15.
21) Lying down face upward. Join hands on the back of your neck, and while practicing this exercise keep your legs stretched, lightly over the ground (the width of a hand approximately). Raise each leg stretched until the vertical line alternately, with the points of your feet stretched. Meanwhile breathe quietly. Three times each. Later tap softly your thighs with your knuckles (Figure 43).
Breath for heart recovery, lying down face upward.
22) Knelt on the ground. Hands stretched horizontally forward; rotate slowly the trunk to right and left with elastic insistence, and breathe out at the same time. 4-6 times each (Figure number 44).
23) At attention (or natural) position. Bend wrists upwards, while joining both palms of the hands in front of the chest; tighten up with both hands together and fingers stretched.
Both arms relaxed through shoulder drive. Relaxation exercise number 1.

- Sitting down on the ground. Crossed legs; join hands on the back of the neck, or let your arms hang freely. Bend the trunk on the left knee; later, on the right knee, and finally forward (Figure number 45).
Breath for heart recovery, lying down face upwards.